
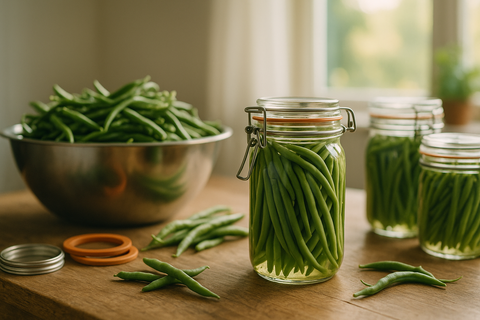
How to Successfully Can Fresh Green Beans: Tips and Recipes for Summer 2024
Season of Plenty Homemade recipes Long-term conservation Economical & healthy
Why can your green beans?
Summer is the perfect time to enjoy fresh, local, and crunchy green beans. Preparing your own preserves means prolonging these flavors all year round, saving money, and avoiding additives. 🥗 In just a few jars, you can transform your garden harvests, your AMAP basket, or market specials into homemade reserves, ready to use for gratins, salads, or quick stir-fries.
Hesitant to get started? Canning green beans is easy even if you've never tried canning. A few tips are all it takes to succeed every time, without any risk or complicated equipment. And to vary the pleasures, consider adding spices or herbs to each jar: garlic, thyme, tarragon, a pinch of pepper...
If you like to optimize your summer cooking, don't hesitate to consult our barbecue and grill selections to complete your aperitifs and seasonal meals!
Ideas for use after opening
Homemade canned green beans are the epitome of versatility. As soon as you open a jar, you can:
Tip: Add a dash of vinegar or mustard to liven up their flavor after a few months in the cupboard. Homemade green beans are perfect for improvising a healthy dish when you come home late or to complement a family barbecue. 🔥
Tips for foolproof canned green beans
The choice of beans
- Choose very fresh , firm, stringless beans (fine or extra-fine varieties).
- Remove the stems, wash them carefully, and cut them if necessary so that they fit well in the jars.
Whitening
- Bring a large pot of water to a boil.
- Soak the beans for one to two minutes, then refresh them in very cold water to set the color (intense green = appetizing!).
The filling
- Store vertically in clean jars, without packing too tightly.
- Cover with boiled salted water (about 20g of salt/liter of water), or add some herbs as you like.
Sterilization
- Seal tightly and sterilize: one hour at 100 degrees in a sterilizer, large pot or pressure cooker.
- Let it cool, check that it is sealed (lid is well rounded or “pops” when opened after storage).
The little extras
- Try different herbs: tarragon for freshness, thyme or bay leaf for a Mediterranean note.
- A hint of chili or garlic subtly enhances the flavors.
By following these steps, your preserves will retain their beautiful color and natural crunch. Hygiene is key: always use very clean jars (boil them under running water or put them in a high-temperature dishwasher before filling).
To discover more seasonal recipes to try, check out Neary's Recipes of the Week !
Equipment and budget to plan for your preserves
Good news: you don't need to invest in professional equipment to make your first homemade jars. Here's what you need to get started with confidence:
Budget-wise, set aside a few euros for jars if you don't already have any. The rest can be found in most kitchens. If you want to go even further in terms of time-saving and practicality, some multifunctional air fryers can also be used to reheat or cook beans in a flash!
For an even more delicious summer, also discover our barbecue & grill selection – your homemade beans will be a hit with kebabs or grilled fish.
FAQ
How long do green beans last in jars?
Properly sterilized and stored away from light, your jars will easily keep for twelve months, sometimes longer. The flavor remains optimal for the first six to eight months.
Is it possible to can food without a sterilizer?
Yes, a large pot or pressure cooker will do the job perfectly. The important thing is to submerge the jars properly and control the boiling time.
How to prevent green beans from getting soggy?
Short blanching and immediate cooling are essential. Do not pack the beans too tightly in the jars and avoid over-sterilization.
Can I flavor my preserves?
Of course! Add a clove of garlic, fresh herbs, or a pinch of chili pepper before filling with salted water. The combinations are endless.
How do I use my homemade green beans for a quick meal?
Rinse them, then toss them in a pan with olive oil, garlic, onion, or spices. You can also reheat them in the microwave or air fryer for a super-quick side dish.


Comments (0)
There are no comments for this article. Be the first one to leave a message!